
Hello everyone!
Recently I have started a project and today after some preparations I can start recording the process by writing this blog.
Apart from this, I have another goal in mind: To help fellow artists on their own journey. Being in this industry for 10 years I got help from many people many times and went through a lot while I tried to stay in the industry. This year is a hard year. But quite an interesting one for me. I held an online workshop, got questions about my workflow, got my very first interview with 80.lv (you can read it here: https://80.lv/articles/001agt-005cg-autumn-in-the-mountains-modular-hero-prop-vegetation/) and had inspiring conversations with other artists who are wiling to keep learning as me. These events made me think the time has come to give back to the community I am part of it.
About the project:
Actually the project mentioned above is not new. More like part of a series or with other words pushing a project always to the next level. You can see the Nohab train in my portfolio. This asset accompanied me on my journey in the game industry since its beginning. Thanks to this I got opportunities I couldn`t have had otherwise (for instance my model was used to create a mold for train shaped cakes). Many say instead of redo a piece after you finished it better to start a totally new one. I think there is no wrong or right approach regarding this. What really matters is what that piece means to you. In case of this train, I have a deep connection with it and in a sense it has been growing with me during these years. So in a way it represents how I grow as an artist. When I had that feeling it is time to open up the model again and update it I did it. Of course working on the same thing over and over again might be not really fun but for me what I can learn with it or how I can show off my skills matter more.
This time I decided to put the train into a small diorama. To create its own little environment. This is not my first attempt to accomplish this. What I am going to show now already went through many stages in the last couple of years. This is why it is good to record the progress this time. To see it from the beginning to its completion. So in the followings I am going to share with you how I approach such a project, how I think and try to solve the challenges along the way.
First steps:
When I work on an environment after I have a rough idea what I want to make I define each phases of the project in a project tracking file. This helps me to follow the progress of the project and estimate how much time required for each phase. At the end I can compare how much time actually I needed to complete each phase. It is a good feedback to see how fast I can progress and where are my strengths and weaknesses. Due to the complexity of such a project it is easy to overlook something. Therefore It also contains the list of assets I am going to create. In this file I document everything so I won`t miss anything.
It depends on the project how many and what phases I need but here is my general approach for a project structure.
- Set up your goals
- Think about the story
- Collect references
- Study tutorials if needed, analyze scenes made by others
- Create blockout
- First lighting pass + composition setup in game engine
- Refine blockout
- First texture pass, master material setup in game engine
- Second texture pass + Second lighting pass in game engine
- Creating and adding decals
- Post processing
- Making renders, videos
- Publication
1. Set up your goals:
This is the starting point: Defining the goals I want to reach. Below you can see what I am aiming for:
- Make a diorama with the train in Unreal Engine 4 with PBR workflow
- Lighting the scene with baked lighting in Unreal Engine 4
- Focus on storytelling, lighting and composition
- Implement the new skills and techniques I learnt
- Write a blog about its progress
- Enjoy the process! :)
2. Think about the story
This step is a must have. It works as a guideline how to reach your goal. Also adds a lot more to the environment itself.
Finding the way how to tell a story is difficult. If I just put assets together in a pack that does not really impress anybody. It does not really tell what I want to convey or express.
In the past couple of years this diorama project for the train came to my mind couple of times. The story I came up with is simple: The train is somewhere and can not leave that place for some reason. It has to wait so it can continue its journey. I gave some thoughts, did some sketches and among many ideas I picked two at the end. One of them was a scene inspired by the train scene in the Spirited Away by Ghibli Studios. I created a scene based on this but somehow it did not really work out. It did not really tell the story I wanted. The other idea was a scene where the train is in a depot waiting for the maintenance get done. I created this scene as well a long time ago and decided to use this for the project.
3. Collect references
Because I have this diorama setting containing exterior and interior environment elements it was really important for me to pick the mood of the scene at this early stage. After checking references from photos and movies I decided to go for a night scene with a classical cold vs warm color setup. (Interior part is going to be the warm, exterior part is going to be the cold.) This creates a nice contrast between the two and helps to focus on the hero asset of the scene which is the train itself.
I come up with a list of assets which would enrich the story I want to tell. I look up each of every them and study them as many angle as possible to understand their shape language, volume and scale.
4. Create blockout
After analyzing the references I refer to my findings to recreate each asset in 3D with the correct size and scale. These models are having low polycount therefore easy to iterate them (The train model is already the final model that is why looks more polished than any other asset on the screenshot). I use a 1.8m high mesh (red box on the screenshot) as a reference for human scale. This way I can see the different assets in context and how they relate to each other in terms of size. I use different colors to make it easier to read the elements.
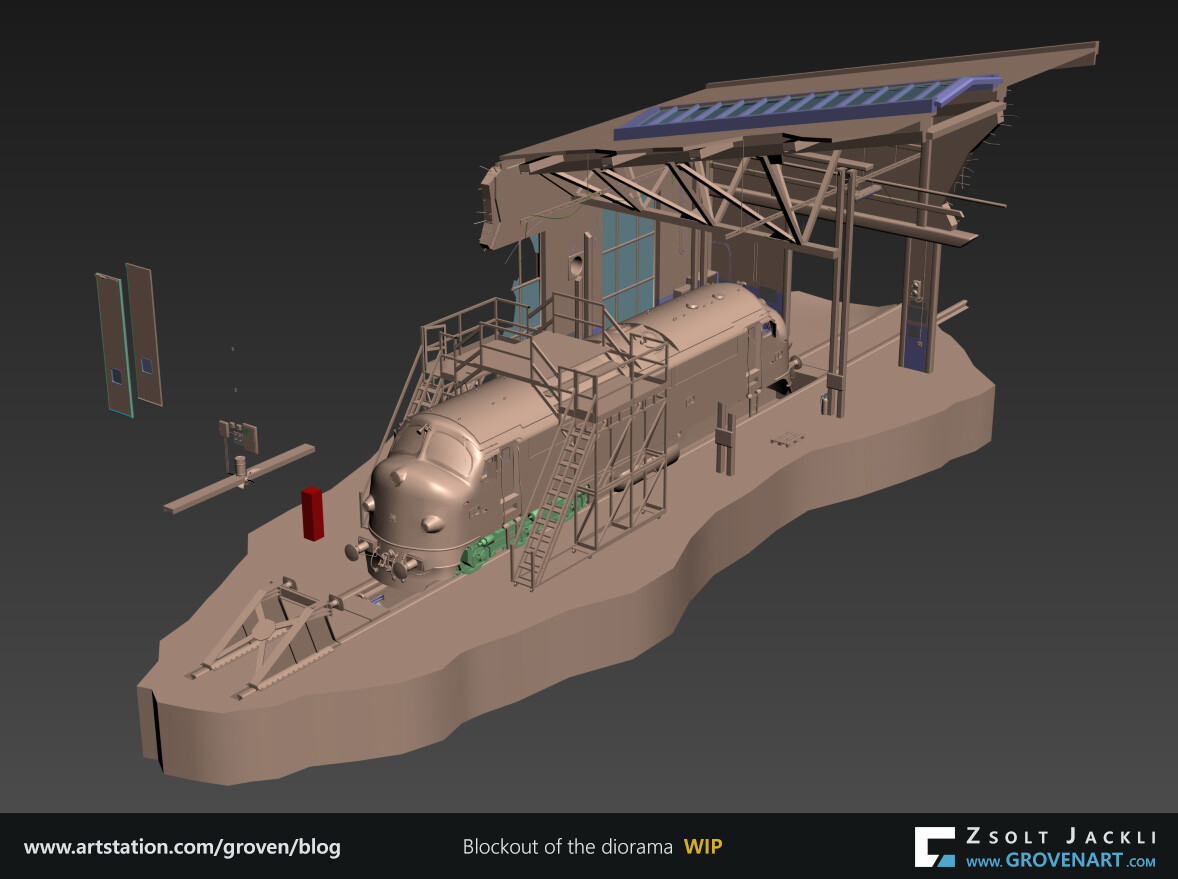
Because I am going to bake the lighting in Unreal I need to UV the assets. Lightmap in Unreal has certain rules. One of them is it requires a second UV set. So these UVs for the lightmap will be different from the UVs I am going to use to texture the asset.
In this blockout phase if I used dynamic lighting in Unreal I would do a quick unwrap anyway because I can save time with it later. For instance the scaffold is quite a complex asset made of many boxes. If I unwrap one piece and using that to build the scaffold I can save time when I make its final UV. If I do not do the UVs now I have to unwrap later each of every piece and place them individually which can be really time-consuming. This approach comes handy also in case when you have to duplicate an asset many times (p.e.: bolt, stairsteps, etc.).
5. Study tutorials if needed, analyze scenes made by others
My experience is I keep learning new things as an artist does not matter how long I am in the industry. New technologies are getting implemented opening up new possibilities to explore. This is really exciting and inspiring part of the industry which pushes me to want to know more.
Tutorials are good to get started with the topic you would like to learn about and to get a sneak peek into other artists` workflow. It is good as a starting point compared to what was available 10 years ago when you had barely no access to such a resource. Still it does not give the solution to you for everything of course. In this digital era where we have easy access to online resources (Artstation, Gumroad, Unreal Marketplace, etc.) became available to get and study other artists` work. For me this is a real treasure chest. The main reason is I can see everything in context: materials, lighting, models of an environment at the same time and study the connection between them. Therefore I purchased Clinton Crumpler`s King Wash Laundromat scene on Unreal Marketplace. It contains everything I would like to study or get better at. Analyzing his work helped me understand what new technical challenges I have to face to achieve my goals. Understanding how certain things were made in his work helps me to find solution for most of the things in my work. Even though these proved to be a big help I am still doing a lot of tests and go through many try-and-error scenarios because my scene is different from his. But generally speaking testing things was always part of the creative process. This is the way to progress.
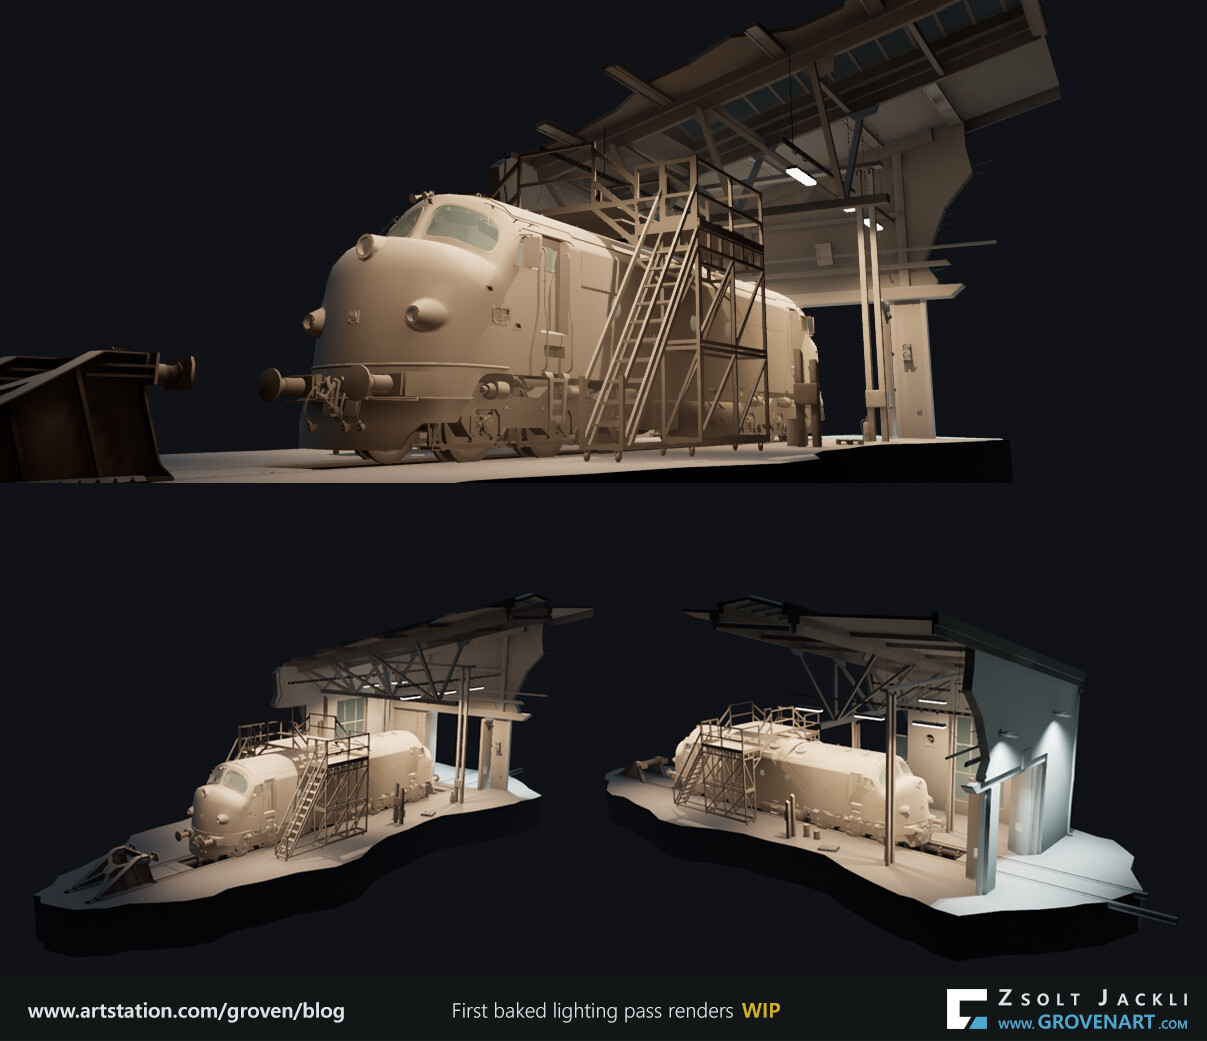
6. First lighting pass + composition setup in game engine
After all the preparation finally I can start assembling the scene in Unreal. Here is what I did:
- I use a material with a mid gray value for the assets. For the glass I create a simplified glass material just to get the light through the object.
- The train, folded door and the scaffold are not single meshes. They are broken into many pieces to get optimized UV size for the baked lightmap. This way I do not need to set a high resolution for the lightmap of an asset. Thanks to this the engine bakes faster and the size and number of the baked lightmaps are not too big/high. To keep them as a single object in the scene each of every them has a Blueprint containing their pieces.
- I made a Blueprint for the cables as well. The reason is if I modify the position of an objects and have to adjust the cables as well I can do it easily in the engine. With this I can avoid going back and forth between 3DsMax and Unreal to fix the cables. I exposed a scale parameter in the Blueprint so I can create cables with different scale (diameter) just adjusting this parameter.
- I set up the scene for Lightmass baking. I added LightmassImportanceVolume and this time I experiment with Lightmass Portals too. I left most of the Lightmass settings by default. I changed only two things: Volumetric lightmap detail cell size set to 100 to increase the number of samples and the Num Indirect Lighting bounces set to 15 to increase the number of indirect lighting bounces. I came up with this values for the test bakes while I was adjusting the settings of the lights. I did the bake with Lighting quality set to Preview.
- I added a PostProcessVolume and set Bloom, Lens Flares, Image effect (vignette), Chromatic Aberration intensity to 0 and the Exposure Min , Max Brightness to 1.
- Apart from all this, tweaking the lights and ExponentialHeightFog, adjusting placement of the assets, finding a good lightmap resolution and fixing lightmap issues ( caused by having not enough space between the UV shells) for each asset were the most time consuming in this phase.

Finding a good composition also requires a lot of testing. The main focus is the story I want to tell. Next to having a good lighting, adding and placing more props plus a well placed camera is crucial to get the composition right. The screenshots I show are still work in progress.
This is all for now.
Have a great holidays, Merry Xmas!
Stay safe and see you next time!