
Before I start talking about my texturing process there is a topic I`d like to dedicate this post to. The topic is as you could read in the title: Take time to investigate.
During a personal project or professional work unexpected challenges can emerge to test our us. When you estimate the time to complete an asset or an environment from start to finish this should be calculated in because you need some time to investigate it. In some cases it can be really annoying for instance due to the time constraint you have. It depends on the issue it can take from 5 minutes to couple of days. But in return you gain knowledge. This is one of the reasons why I like doing personal projects which are a bit more flexible timewise. On a long run the time spent on investigating an issue can be helpful and save time later.
In my my second post I talked about how I used blueprints to group multiple meshes together and keep the texel density of big assets. I mentioned the issue of casting shadow of a large actor (in my case this was the floor) and after adding 40 meshes the blueprint started to cause errors. These really bugged me and I looked into them to find out why these issues arose. So far I`ve used dynamic lighting in Unreal but have had a basic knowledge how static lighting works. This is the very first time I use baked lighting for a more complex project. Also same goes for blueprints. So I took time to investigate these issues. I found useful information scattered across multiple forums but I also did a lot of testing, adjusting models and rebuilding blueprints to find the solution. Below I summarize all my findings to have everything in one place:
1) Set mesh mobility to static and check nothing is broken
1) Set mesh mobility to Static and check nothing is broken
The reason was very simple why I got the errors at the first place. For baked lighting the mobility of my meshes should be set to Static. But in the blueprints they were set to movable. When you add a mesh to the scene their mobility set to static by default. But if you add a mesh to a blueprint its mobility set to movable by default. If the mesh is set to movable it won`t be baked by Lightmass. So this should be corrected.
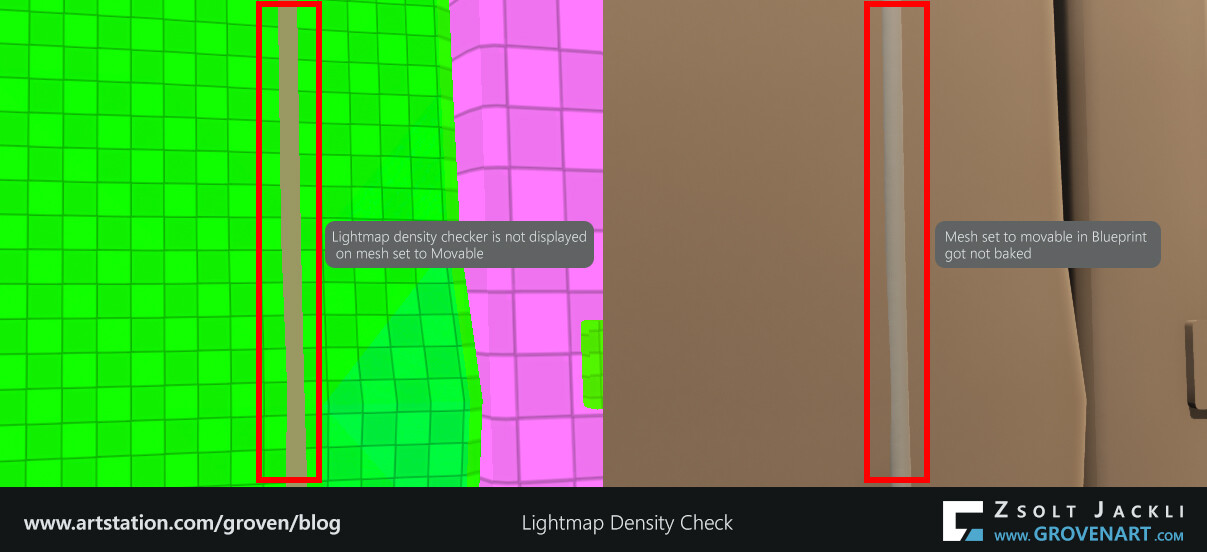
The easiest way to check if the mesh is set to static is to check its properties. But if you switch to lightmap density view in Unreal (Default key: Alt+0) and the checker map is displayed on the mesh then its mobility set to static. But if you get a solid color like in the image below that indicates the mesh was not set to static so Lightmass will not bake it. This is a strong visual feedback and I use this heavily due to the fact that in my scene I have more than hundred assets.
When I created the cable blueprint drag and dropped a Scene component over the Default Scene Component to get rid of the white ball. I did not want to have it visible when I place the cable in the scene. Because the cable mesh is attached to a spline in this case the mobility of the Scene component should be changed and not the mobility of the spline. However after setting it to Static I constantly got a solid color in the lightmap density view and the cable did not get baked. It seemed like Lightmass totally ignores the mobility of the Scene component. I checked different forums but could not find any answers to my issue, so I checked exsiting blueprints in other scenes to find a hint. This is how I came across the tooltips in Blueprints. All the components in Blueprints have a tooltip if you hover over them with the mouse. The corrupted Scene Component I had did not have any at all. During the swapping process the Blueprint might got corrupted. This is how I found out my Blueprint was broken. After remaking the cable Blueprint and placing the cable again in the scene it showed up in the Lightmap density view and got baked properly.
2) Dealing with static mesh having light seams
If every mesh set to Static and a light bake test can reveal the light seams which can be caused by:
- Not enough padding (space) between UV shells on the lightmap channel (usually the second UV channel)
- Overlapping polygons on the lightmap channel
- Unweld or floating vertices in the mesh causing UV issues
If everything set up correctly but still got light seams it is worth to check if there are inverted UVs. If there are flip them (in some cases this was the solution for me to get rid of the light seam)
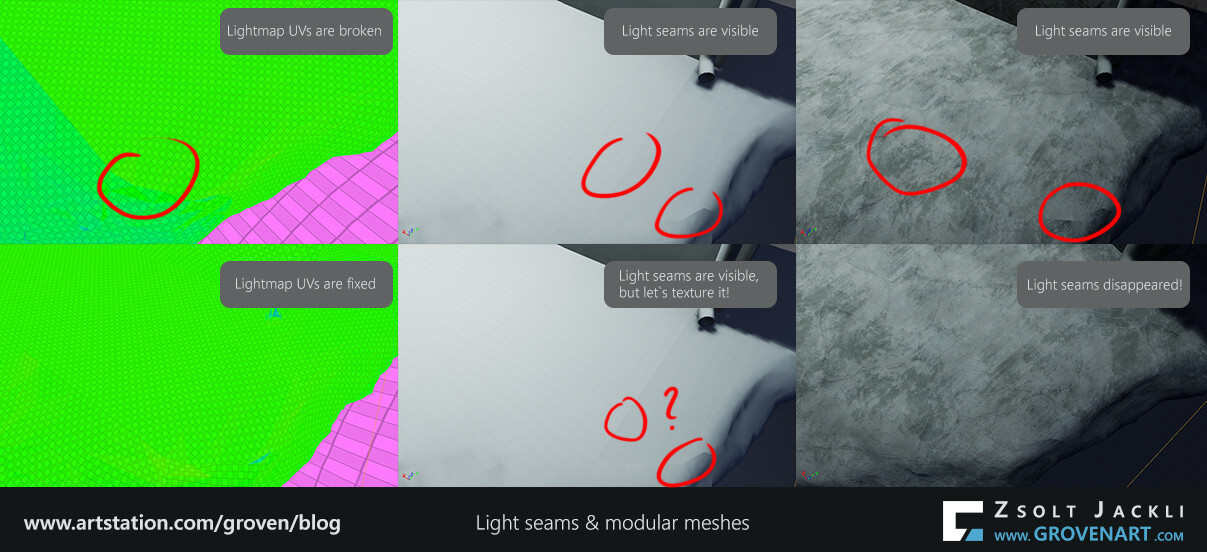
For modular pieces the UVs on the lightmap channel should be snapped to the grid and have the same texel density to get rid of the seams. Because of this I had to break the big decimated bottom part of the floor into several meshes. Also it is worth to double check if the size of the modular meshes is correct, meaning no floating, lonely vertices and the different pieces snap perfectly together.
3) Adjust the Lightmass settings and/or Bake quality
It can happen that after making adjustments on the UVs of the lightmap channel but the light seams still appear. They won`t go away in every case no matter how perfect the set up is. The engine and its algorithms play a big role in how the baked lighting is computed. Luckily there is still an option that can help to get rid of the seams. Adjusting the Lightmass settings by increasing the Indirect Lighting Quality and decreasing the Indirect Lighting Smoothness can help to smooth out the seams to make them disappear (Note: This can increase the baking time). Also in some cases changing from Preview to Medium quality bake can also help.
4) Check the baked mesh with a tileable texture
If everything goes well light seams are gone or there are in places where hard to notice them. But I run into a case (see the image below) where I got the light seams despite of the steps explained above. After double checking my meshes and UVs I applied a tileable texture on the meshes Just for test purposes. They will be textured anyway, so I thought it is good to check them with a texture. For my surprise the seams were not visible anymore (Note: If you apply a texture on modular pieces do not forget to set up the texture channel, usually the first UV channel, properly to not to get texture seams).
I hope these findings help those who new to baked lighting in Unreal.
Stay safe and see you next time!